Tag: MOTU

  • Click Sample and Creating Click Track in Digital Performer

    Click Sample and Creating Click Track in Digital Performer

    Download the Click sample

      Hiro’s Click (1.5 KiB, 1,262 hits)

    Save this folder to where you will not move or delete such as ~/Home/Music/ or Digital Performer (DP) Clippings cannot function.


    1 DP Clipping 1 Create a new Digital Performer Clipping Window

    • Project → Clippings → New Digital Performer Clipping Window
    • This is a global Clipping which can be accessed from any DP projects
    2 DP Clipping 2 Name the Clipping Window “Click”

    • The window pops up but can be hard to see
    • Warning: If you missed this opportunity to name the window, the default “untitled” will be committed and it becomes hard to rename.
    3 DP Clipping 2 Drag and drop the downloaded Click file to the Clipping window
    4 DP Clipping 4 Next time when you need this window open, it shows up at Project → Clippings →
    5 DP Clipping 5
    1. Add a mono audio track
    2. Name the track “Click Track”
    3. Set the Grid constraint to your needs, i.e. Quater Note value
    4. Drag and Drop the Clipping to the track
    5. Repeat to fill a measure (You can Option + Drag the fist one to copy the rest of the beats as well)

    Now you have a measure filled clicks

    6 DP Clipping 6 You can highlight the measure and repeat (⌘+R) the measure, or starting from DP10.1, you can utilize the Clip feature which I explain.

    1. Highlight the measure you wish to make it a Clip
    2. Region → Pack Into Clips (Control + Shift + 1) or adding Option key gives more options as shown in the screenshot.
    7 DP Clipping 7 Once a Region became a Clip,

    1. Place the mouse pointer at the edge until the arrow turns into an arrowed circle as shown in the screenshot.
    2. Drag to extend until the end of the song
  • Digital Performer

    Digital Performer

    Record, edit, mix, process and master polished recordings. Combine external hardware synths, controllers, mics, instruments, compressors with virtual instruments, loops, audio tracks and MIDI tracks, all together in a seamless, intuitive production environment. Work musically with features like the Drum Editor and QuickScribe notation, then switch gears for creative production techniques with inspiring plug-ins like DP’s Subkick, Ensemble Chorus, and guitar FX plug-ins. Import loops, launch virtual instruments and 3rd-party plug-ins: Digital Performer is the consummate host. Then polish your recording with Digital Performer s extensive editing, mixing, processing and mastering tools. No matter how you approach your music and audio production, DP’s highly customizable user interface empowers your personal workflow.MIDI, audio and virtual instrumentsDigital Performer excels at bringing together the worlds of MIDI sequencing, multitrack audio recording, virtual instruments, and loops and sound libraries. Work with all forms side by side, with dedicated editors for each, but also common editing, mixing and processing features that work in the same familiar fashion.Work with multiple sequences in a single projectDigital Performer is still the only audio workstation application that allows you to create multiple sequences in a single project. Regardless of what you create with DP, you’ll undoubtedly end up producing multiple versions of it. Why not have them all in the same project file, at your fingertips, using the same effects processing and virtual instrument resources? Need to use Digital Performer for live performance? Create a single file with all your songs in it, organized into 45-minute song sets or however you like. Digital Performer is the preferred workstation software for live touring, due in large part to this essential feature. Digital Performer’s ability to assist you in creating and managing multiple sequences is unparalleled.Unlimite

    (From Amazon description)

    View on Amazon
  • Troubleshoot Digital Performer Crash

    Troubleshoot Digital Performer Crash

    Disable Digital Performer’s crash reporter

    Digital Performer 9 has its own crash reporter, which intercepts macOS crash reporter and send the report to MOTU automatically. MOTU is constantly monitoring sent report to improve their products.  However, this function prevents from user to view the crash report.

    If you are able to reproduce the crash, I encourage you to temporary disable MOTU’s crash reporter so you can troubleshoot by yourself.

    1. Go to Applications Folder ➡︎ Utilities Folder, then open Terminal.app
    2. Copy/paste following line (all in 1 line)
      arch -x86_64 "/Applications/Digital Performer.app/Contents/MacOS/Digital Performer" --disable_crash_reporter &
    3. Hit [Enter]

    Digital Performer starts up with its crash reporter disabled. If you quit Digital Performer and start it again with double-clicking the application as normal you do, the MOTU crash reporter will be activated again.

    Make it crash.  If you do not know how to crash Digital Performer, you sill need to start it with above method with Terminal.app until you see the crash. When crashed, if macOS presents the crash notification, click “See details” then jumps to Step 3 below.

    Open Console.app (Skip to Step 3 if Crash Notification shows the crash report)

    1. Use Spotlight to start the Console.app by first click on the Spotlight icon (or type ⌘ + Space)
      Spotlight icon
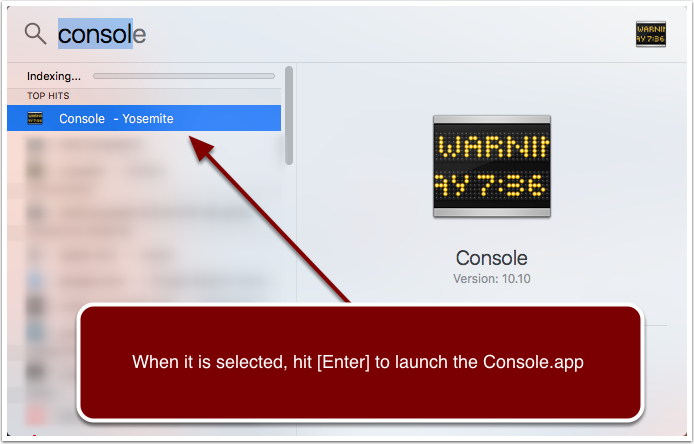
    2. Type “Console” into Spotlight.  When highlighted, hit [Enter] to start Console.app
      Spotlight
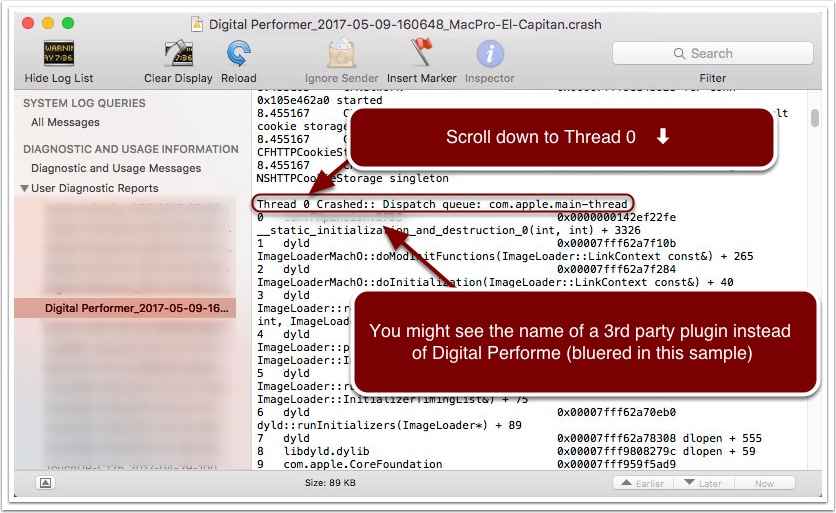
    3. Locate “User Diagnostic Report” and find Digital Performer item. Make sure the date and time matches your crash incident. (note that older Mac OS X Console.app might not have “User Diagnostic Report” item. Try to find under Log Files ➡︎ ~/Library/Logs/  ➡︎ CrashRepoter) Look for “Crashed Thread” and make a note of the number listed.  In this example, it is “0” as shown.
      Crash Log 1
    4. Scroll down to locate the noted thread where it gives you a clue what crashed.
      Crash log 2

    This information is only useful to determine if something outside of Digital Performer, e.g., a 3rd party plugin crashed Digital Performer, then you can remove it to stop the crash. If the log shows no noticeable 3rd party name then you need to consult with MOTU. The 3rd party plugins are located in System level directory, which you will not have a direct access.

    To access AU plugin folder

    1. Go to Finder
    2. Type ⌘ + Shift + G
    3. Paste this line
      /Library/Audio/Plug-Ins/Components
    4. Hit [Enter]